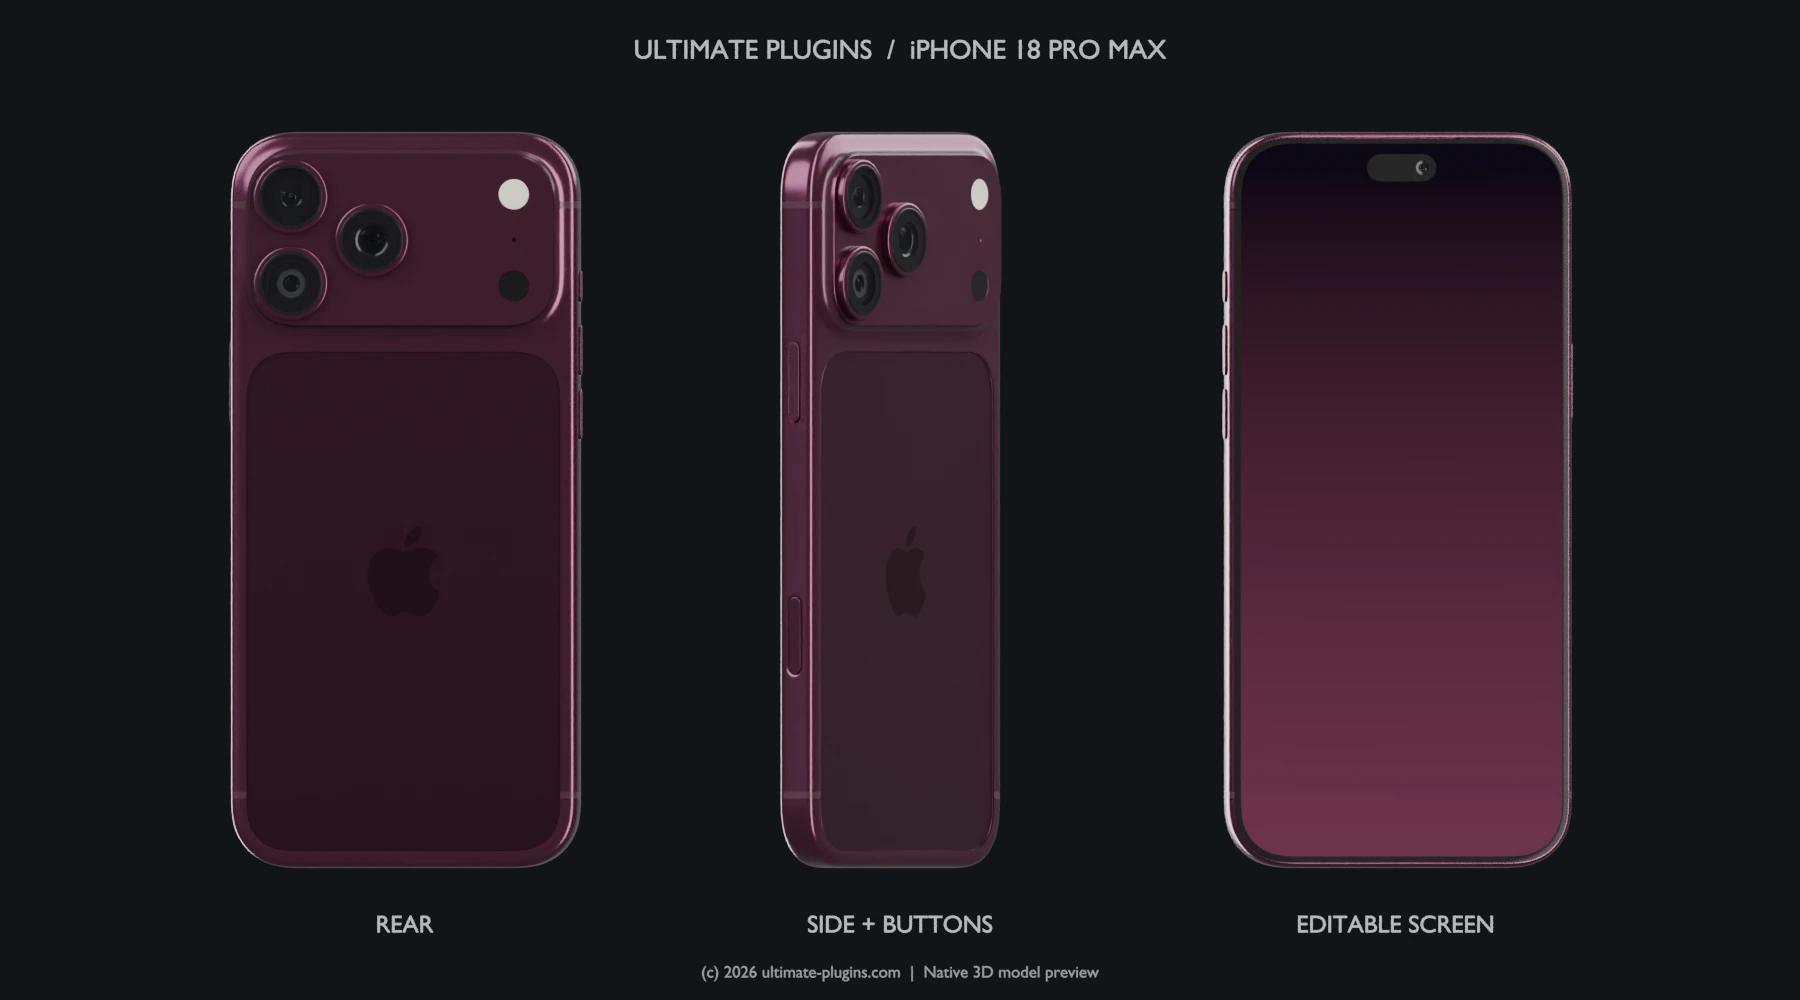
iPhone 18 Pro Max mockup in After Effects: the complete control guideموك أب iPhone 18 Pro Max في After Effects: شرح كامل للتحكماتiPhone 18 Pro Max Mockup in After Effects: alle Regler erklärtMockup de iPhone 18 Pro Max en After Effects: guía de todos los controles
Put your design on a 3D phone. Choose an animated or static setup, edit motion with native keyframes, and learn every Effect Control.اعرض تصميمك على هاتف ثلاثي الأبعاد. اختر موك أب متحركًا أو ثابتًا، واضبط الحركة بالـKeyframes، وتعرّف على جميع عناصر التحكم.Dein Design auf einem 3D-Telefon: animiert oder statisch starten, native Keyframes bearbeiten und jeden Effect Control verstehen.Presenta tu diseño en un teléfono 3D: elige una versión animada o estática y ajusta cada movimiento con keyframes nativos.
Download the free mockup
Sign in or create a free account to download. The site owner receives a download notification.
The updated tool reports a random installation ID, operating system, After Effects version and last connection, linked to your download account. No project files or computer name are sent. Keep all extracted files together.
Square screen edges? Refresh the preview
If square corners or a rectangular edge appear around the screen, refresh the composition preview: change its resolution from Full to Half, or from Half to Full, then preview the same frame again. You can return to your preferred resolution after the image refreshes.
This is the workaround for the reported preview issue. It does not change the phone’s shape or the project dimensions. The script prepares the screen cutout before connecting it to the 3D scene, but it does not perform an automatic post-build preview refresh. Check the same frame at Full resolution before final export.
What you are downloading
This is a JSX script that builds an editable After Effects project structure using an embedded 3D phone, lighting and expressions. You run the file once to build the mockup; you do not paste it into an expression field. The download is not a prebuilt AEP or an installed extension.
The default animated MAIN composition is 1080 × 1920, 30 fps and 10 seconds long, with a transparent background. The replaceable screen composition is 1320 × 2868.
Before you start
Use After Effects 2025 (25.0) or newer, with native 3D-model support.
Extract the ZIP to a permanent, writable folder.
In Preferences → Scripting & Expressions, enable Allow Scripts to Write Files and Access Network. The script writes its embedded assets beside the JSX.
Build your first mockup
Open your project and activate the composition where you want the phone. Put the playhead at its intended start.
Choose File → Scripts → Run Script File and open Launch_iPhone_Mockup.jsx.
In the setup window, choose With Animation for the preset motion, or Without Animation for a static phone. Closing this setup window cancels the operation.
The embedded Ultimate Plugins screen artwork loads automatically; no image-selection dialog is required. Replace that artwork later inside REPLACE SCREEN.
The script inserts IP18PM_001 - iPhone 18 Pro Max - MAIN at the playhead, fits it to the active composition and selects it. Without a suitable host composition it opens MAIN itself. The numeric prefix can differ.
Select MAIN and open Window → Effect Controls. Inside MAIN, select CONTROLS for appearance settings, or PHONE - ANIMATE ME for the animated Progress properties.
Choose animation or a static phone
With Animation: creates entry, turn and exit keyframes. The MAIN layer has 15 Effect Controls, including the three Progress sliders. No motion markers are created.
Without Animation: creates a static front-facing phone with 10 manual Effect Controls. There are no preset motion keyframes or motion markers, and Automatic Rise And Turn, Automatic Exit and the three Progress sliders are absent. You can animate the manual controls yourself later.
Animated mode starts with a 10-second sequence. A static instance can fill the remaining duration of its host composition. Both modes have a transparent background.
Three views of the bundled model; this preview was rendered outside After Effects.
Replace the screen
Open 02 - EDIT SCREEN → REPLACE SCREEN. Select DEFAULT SCREEN - Ultimate Plugins, then Alt-drag (Windows) or Option-drag (macOS) your imported image or video from the Project panel onto that layer. This keeps the linked screen setup. The Fit/Fill expression reads the replacement’s current dimensions, so it also handles a change in aspect ratio.
Alternatively, add your own layers and hide the default artwork. The mockup applies the display outline and Dynamic Island cutout. Set a video layer’s start, out point and any freeze or loop inside REPLACE SCREEN. It does not automatically wait for the front reveal; shift your content if playback should begin only when the phone faces forward.
Duplicated MAIN instances have independent controls and motion keyframes, but share the same REPLACE SCREEN source. Editing that source changes all instances using it.
Every Effect Control
The 10 shared controls work in both modes. Automatic Rise And Turn, Automatic Exit, Entry Progress, Turn Progress and Exit Progress are available only with With Animation. On MAIN, Progress appears directly in Effect Controls; inside the source composition, those three sliders are on PHONE - ANIMATE ME.
Phone Color
Default: Burgundy
Choose Burgundy, Glacier Blue, Silver or Black. This switches the phone finish without recoloring your screen or the camera lenses.
Phone Size Percent
Default: 100
Scale the phone and its attached screen together inside the mockup. 120 makes it 20% larger; 80 makes it 20% smaller. This is separate from the MAIN layer’s Transform > Scale.
Manual Y Rotation
Default: 0°
Turn the phone left or right around its vertical axis. This angle is added to the automatic turn. Disable Automatic Rise And Turn for a fully manual front-to-back rotation.
Manual X Rotation
Default: 0°
Tilt the phone forward or backward. The value adds to the small automatic tilt, so begin with a modest angle such as 10°.
Manual Z Rotation
Default: 0°
Rotate the phone clockwise or counterclockwise in the image plane. Use a small angle for a diagonal composition, or animate it with keyframes.
Automatic Rise And Turn
Default: On
With Animation only. Enables the preset rise and rear-to-front turn driven by Entry Progress and Turn Progress keyframes. Disable it for a centered phone using the manual rotation controls. The full preset exit also depends on this switch.
Automatic Exit
Default: On
With Animation only. Enables the exit driven by Exit Progress keyframes. Keep Automatic Rise And Turn on for the complete preset exit. Disable Automatic Exit to keep the phone visible after the reveal.
Studio Light Intensity
Default: 90
Set the strength of the environment lighting and reflections on the 3D phone. Increase gradually for brighter highlights; this does not brighten the screen media.
Studio Rotation
Default: 0°
Rotate the lighting environment around the phone to move the reflections. The phone and camera stay in place. Try 45° or 90° to find a cleaner highlight on the edges.
Screen Brightness Percent
Default: 100
Controls the visible screen overlay from 0 to 100. Despite its name, this is an opacity control, not exposure: 0 hides your screen content; 100 shows it fully. Values above 100 are clamped.
Fit Entire Screen Media
Default: Off
Off uses Fill: covers the whole display and may crop the edges. On uses Fit: shows the complete selected image or video and may leave unused space. It preserves the media’s aspect ratio.
Reset to Initial Setup
Default: Off
Enable once; it returns to Off after resetting. Restores appearance defaults and the captured placement, timing, scale, rotation, opacity and parent of a nested MAIN layer. Animated mode restores the initial Progress keyframes; static mode stays static. Removes custom keys/expressions on reset properties without replacing your screen media. Requires the current session helper.
Entry Progress
Default: 0 → 100
With Animation only. 0 keeps the phone below the frame; 100 completes its rise to the rear view. Move the two native keys to adjust entry timing. Requires Automatic Rise And Turn.
Turn Progress
Default: 0 → 100
With Animation only. 0 is the rear-view stage; 100 completes the turn to the screen. Adjust its keyframe spacing and easing for the reveal. Manual rotation values remain additive.
Exit Progress
Default: 0 → 100
With Animation only. 0 has not started the exit; 100 completes it. Move this pair to set when and how quickly the phone leaves. For the full motion, enable both automatic switches.
Time the animation with keyframes
Animation now uses native keyframes, not markers. Select the animated MAIN layer in your composition and press U to reveal the animated properties. Each Progress slider starts at 0 and ends at 100:
Entry Progress → Turn Progress → Exit Progress
Progress
Default
What it does
Entry Progress
0 → 1.8 s
0 → 100: rise from below to the rear view.
Turn Progress
2.5 → 5.1 s
0 → 100: turn from the rear to the screen.
Exit Progress
7.5 → 9.6 s
0 → 100: leave the frame with a turn.
Move a pair of keyframes closer together to speed up that phase, or farther apart to slow it down. Move both keys together to shift the phase without changing its duration. For example, leave the Turn Progress 0 key at 2.5 s and move its 100 key from 5.1 s to 3.8 s: the turn takes 1.3 s instead of 2.6 s. The gaps between Entry/Turn and Turn/Exit are the rear and front holds. Use the Graph Editor to adjust easing. These are local times for the default 10-second animation; insertion near the end of a shorter host composition compresses the initial timing.
Reset and reopen a project
Run the JSX once per After Effects session to activate automatic control attachment, Reset and duration following. After reopening an AEP, select the existing MAIN instance, run the JSX and choose the same animation mode to reuse that mockup. Choosing a different mode can create or reuse a different compatible mockup.
Attached controls, expressions and native keyframes remain saved in the AEP. With the session helper active and MAIN selected, moving the final motion keys can extend the layer and its nested sources within the host composition’s duration. Explicit Time Remap or non-positive Stretch disables this automatic duration adjustment.
Reset to Initial Setup restores the initial appearance and layer placement. Animated mode also restores the initial Progress keyframes; static mode stays static. It removes custom animation on the properties being reset, so save first if you want to keep your edits. The one-time setup dialog replaces the old floating Apply Controls / Reset window.
Remove the mockup completely
Run the JSX again.
In Remove an existing mockup, choose the intended mockup from the dropdown. Check the displayed instance and item counts.
Click Remove Mockup. This removes all instances of that chosen mockup and its generated project items, not just one MAIN layer.
Run the JSX again and choose With Animation or Without Animation for a fresh setup.
Custom media and resources used elsewhere are preserved; retained items may be moved to Preserved media - IP18PM_…. The removal can be undone through Edit → Undo. It removes items from the AEP, not the extracted assets from your disk. Deleting only MAIN from the timeline leaves the source compositions behind.
Save, preview and export
Save the project yourself as an AEP. Keep iPhone18_ProMax_Assets_v4_0 and your chosen media with it, including the shared BIN, all glTF files and the HDR. The asset folder retains this name in v1.0.
Preview starts at Half resolution with motion blur off. Use Full resolution for a final quality check.
The mockup has no BACKGROUND layer. Add your background underneath MAIN, or export through a format and output setting that supports RGB + Alpha.
Common questions
Square corners appear around the screen
Change the composition preview resolution from Full to Half, or Half to Full, then preview the same frame again. Return to your preferred resolution after the display refreshes.
The controls or Reset do not respond
Select the existing MAIN layer, run the JSX in the current AE session and choose the same animation mode. Open Effect Controls. Keep the composition and layer selected for the automatic helper.
There are no Progress keyframes or automatic-motion controls
Check which mode you chose. Without Animation deliberately creates neither. In With Animation, select MAIN and press U; inside MAIN, select PHONE - ANIMATE ME.
The phone does not enter, turn or exit
Check Automatic Rise And Turn, Automatic Exit, the three Progress keyframe pairs, the layer out point and the host composition duration.
Reapplying the script after deleting MAIN causes trouble
Use Remove Mockup in the setup window to remove the chosen mockup’s generated project structure, then run the script again.
The screen fades instead of brightening
Screen Brightness Percent controls opacity. For exposure or color correction, work inside REPLACE SCREEN.
Guide based on the v1.0 source. Native execution and final rendering depend on your After Effects version and system. Adobe: running scripts in After Effects
حمّل الموك أب مجانًا
سجّل الدخول أو أنشئ حسابًا مجانيًا للتحميل. يصل إلى صاحب الموقع إشعار بالتحميل.
ترسل النسخة المحدّثة معرّف تثبيت عشوائيًا ونظام التشغيل وإصدار After Effects وآخر اتصال، وترتبط بحساب التحميل. لا تُرسل ملفات المشاريع أو اسم الكمبيوتر. احتفظ بكل الملفات معًا بعد فك الضغط.
ظهرت حواف مربعة حول الشاشة؟ حدّث الـPreview
إذا ظهرت زوايا مربعة أو حافة مستطيلة حول شاشة الهاتف، حدّث المعاينة من قائمة دقة العرض أسفل نافذة الـComposition: غيّر Full إلى Half، أو Half إلى Full، ثم أعد معاينة الفريم نفسه. بعد تحديث الصورة يمكنك الرجوع إلى الدقة التي تفضّلها.
هذا هو الحل العملي لمشكلة المعاينة التي ظهرت أثناء الاستخدام؛ لا يغيّر شكل الهاتف أو مقاس المشروع. يجهّز السكربت قناع الشاشة قبل ربطها بالمشهد ثلاثي الأبعاد، لكنه لا ينفّذ تحديثًا تلقائيًا للمعاينة بعد الإنشاء. راجع الفريم نفسه بدقة Full قبل التصدير النهائي.
ما نوع الملف؟
الملف عبارة عن سكربت JSX يبني لك موك أب قابلًا للتعديل داخل After Effects، باستخدام نموذج هاتف وإضاءة مدمجين وExpressions تربط الحركة والتحكمات. تشغّل الملف لإنشاء الموك أب؛ لا تنسخ محتواه داخل خانة Expression. التحميل ليس مشروع AEP جاهزًا ولا إضافة تحتاج إلى تثبيت.
كومبوزيشن MAIN المتحرك الافتراضي بمقاس 1080 × 1920، ومعدل 30 فريمًا في الثانية، ومدة 10 ثوانٍ، وخلفية شفافة. كومبوزيشن الشاشة القابلة للاستبدال بمقاس 1320 × 2868.
قبل التشغيل
استخدم After Effects 2025 بإصدار 25.0 أو أحدث، مع دعم النماذج ثلاثية الأبعاد.
فك الضغط داخل مجلد ثابت يسمح بكتابة الملفات.
من Preferences → Scripting & Expressions فعّل Allow Scripts to Write Files and Access Network؛ يحتاج السكربت إلى استخراج ملفاته بجوار ملف JSX.
إنشاء أول موك أب
افتح مشروعك وحدّد الكومبوزيشن الذي تريد إضافة الهاتف داخله، ثم ضع مؤشر الزمن عند نقطة البداية المطلوبة.
من File → Scripts → Run Script File اختر Launch_iPhone_Mockup.jsx.
ستظهر نافذة الإعداد: اختر With Animation لإضافة الحركة الجاهزة، أو Without Animation لهاتف ثابت. إغلاق هذه النافذة يلغي العملية.
تُضاف صورة Ultimate Plugins المدمجة إلى الشاشة تلقائيًا، دون نافذة لاختيار صورة. يمكنك استبدالها لاحقًا داخل REPLACE SCREEN.
يضيف السكربت IP18PM_001 - iPhone 18 Pro Max - MAIN عند مؤشر الزمن، ويضبط حجمه ليلائم الكومبوزيشن النشط ويحدّده. إذا لم يكن هناك كومبوزيشن مناسب مفتوح، يفتح MAIN نفسه. قد تختلف الأرقام في بداية الاسم.
حدّد MAIN وافتح Window → Effect Controls. داخل MAIN نفسه، حدّد CONTROLS لإعدادات المظهر، أو PHONE - ANIMATE ME لخصائص Progress المتحركة.
اختر موك أب متحركًا أو ثابتًا
With Animation: يضيف Keyframes للدخول والدوران والخروج. تظهر على طبقة MAIN خمسة عشر عنصر تحكم، منها خصائص Progress الثلاث. لا ينشئ Markers للحركة.
Without Animation: يضيف هاتفًا ثابتًا مواجهًا للأمام بعشرة عناصر تحكم يدوية، دون Keyframes جاهزة أو Markers للحركة. لا تظهر Automatic Rise And Turn أو Automatic Exit أو خصائص Progress الثلاث. ويمكنك تحريك الخصائص اليدوية بنفسك لاحقًا.
يبدأ الوضع المتحرك بتسلسل مدته 10 ثوانٍ، بينما يمكن أن تمتد النسخة الثابتة لباقي مدة الكومبوزيشن الأساسي. الخلفية شفافة في الوضعين.
ثلاث زوايا للنموذج المرفق؛ هذه المعاينة مرندرة خارج After Effects.
استبدال محتوى الشاشة
افتح 02 - EDIT SCREEN → REPLACE SCREEN وحدّد طبقة DEFAULT SCREEN - Ultimate Plugins. اسحب الصورة أو الفيديو الجديد من Project فوق الطبقة مع الضغط على Alt في Windows أو Option في macOS للاحتفاظ بإعدادات الشاشة المرتبطة. يقرأ Expression الـFit/Fill أبعاد الملف الحالي، لذلك يتعامل أيضًا مع اختلاف نسبة الأبعاد بعد الاستبدال.
يمكنك بدلًا من ذلك إضافة طبقاتك وإخفاء الصورة الافتراضية. يطبّق الموك أب شكل الشاشة وفتحة Dynamic Island. اضبط بداية الفيديو ونهايته وأي تثبيت أو تكرار داخل REPLACE SCREEN؛ فالمحتوى لا ينتظر تلقائيًا لحظة ظهور وجه الهاتف. حرّك توقيته إذا أردت بدء العرض عند ظهور الشاشة فقط.
نسخ MAIN لها تحكمات وKeyframes مستقلة، لكنها تشترك في مصدر REPLACE SCREEN نفسه؛ تعديل هذا المصدر ينعكس على جميع النسخ التي تستخدمه.
شرح جميع عناصر Effect Controls
تعمل عشرة تحكمات مشتركة في الوضعين. تظهر Automatic Rise And Turn وAutomatic Exit وEntry Progress وTurn Progress وExit Progress فقط عند اختيار With Animation. خصائص Progress موجودة مباشرة في Effect Controls لطبقة MAIN؛ وداخل كومبوزيشن المصدر تجدها على PHONE - ANIMATE ME.
Phone Color
الافتراضي: Burgundy
اختر Burgundy أو Glacier Blue أو Silver أو Black لتغيير لون جسم الهاتف، مع الحفاظ على ألوان محتوى الشاشة وعدسات الكاميرا.
Phone Size Percent
الافتراضي: 100
يغيّر حجم الهاتف والشاشة المرتبطة به معًا داخل الموك أب. القيمة 120 تكبّره بنسبة 20%، و80 تصغّره بنسبة 20%. وهو مستقل عن Transform > Scale لطبقة MAIN.
Manual Y Rotation
الافتراضي: 0°
يلف الهاتف يمينًا ويسارًا حول المحور الرأسي. تُضاف هذه القيمة إلى الدوران التلقائي؛ أوقف Automatic Rise And Turn إذا أردت التحكم اليدوي في الدوران من الأمام للخلف.
Manual X Rotation
الافتراضي: 0°
يميل الهاتف للأمام أو الخلف. تُضاف القيمة إلى الميل التلقائي البسيط؛ جرّب قيمة صغيرة مثل 10 درجات أولًا.
Manual Z Rotation
الافتراضي: 0°
يدير الهاتف مع عقارب الساعة أو عكسها داخل إطار الصورة. استخدم زاوية بسيطة لتكوين مائل، أو حرّك القيمة بالـKeyframes.
Automatic Rise And Turn
الافتراضي: On
يظهر في With Animation فقط. يشغّل الصعود والدوران من الخلف للأمام وفق Keyframes خاصيتَي Entry Progress وTurn Progress. أوقفه لهاتف في موضع العرض مع الدوران اليدوي. حركة الخروج الجاهزة الكاملة تعتمد أيضًا على تشغيله.
Automatic Exit
الافتراضي: On
يظهر في With Animation فقط. يشغّل الخروج وفق Keyframes خاصية Exit Progress. اترك Automatic Rise And Turn مفعّلًا للحركة الكاملة، أو أوقف Automatic Exit ليظل الهاتف ظاهرًا بعد استعراض الشاشة.
Studio Light Intensity
الافتراضي: 90
يتحكم في قوة إضاءة الاستوديو والانعكاسات على جسم الهاتف ثلاثي الأبعاد. زد القيمة تدريجيًا للحصول على لمعان أوضح؛ لا يغيّر إضاءة محتوى الشاشة.
Studio Rotation
الافتراضي: 0°
يدوّر بيئة الإضاءة حول الهاتف لتغيير اتجاه الانعكاسات، مع ثبات الهاتف والكاميرا. جرّب 45 أو 90 درجة لضبط اللمعة على الحواف.
Screen Brightness Percent
الافتراضي: 100
يتحكم في ظهور طبقة محتوى الشاشة من 0 إلى 100. رغم اسم Brightness فهو يغيّر الشفافية وليس التعريض: 0 يخفي المحتوى و100 يُظهره بالكامل. القيم الأعلى من 100 لا تزيد السطوع.
Fit Entire Screen Media
الافتراضي: Off
عند إيقافه يعمل وضع Fill: يملأ الشاشة وقد يقص أطراف الصورة. عند تشغيله يعمل وضع Fit: يظهر الملف كاملًا وقد يترك فراغات. في الحالتين يحافظ على نسبة أبعاد الملف.
Reset to Initial Setup
الافتراضي: Off
فعّله مرة، ثم يعود إلى الإيقاف بعد التنفيذ. يعيد المظهر الافتراضي وموضع طبقة MAIN وتوقيتها وحجمها ودورانها وشفافيتها والـParent وقت الإضافة. يعيد Keyframes الـProgress الأولى في الوضع المتحرك؛ ويُبقي الوضع الثابت بلا حركة جاهزة. يحذف المفاتيح والـExpressions المخصصة للخصائص التي يعيدها، ولا يستبدل محتوى الشاشة. يتطلب تشغيل السكربت في الجلسة الحالية.
Entry Progress
الافتراضي: 0 → 100
يظهر في With Animation فقط. القيمة 0 تُبقي الهاتف أسفل الإطار، و100 تُكمل صعوده لاستعراض الظهر. حرّك المفتاحين لتحديد مدة الدخول. يتطلب تشغيل Automatic Rise And Turn.
Turn Progress
الافتراضي: 0 → 100
يظهر في With Animation فقط. 0 تمثل مرحلة استعراض الظهر، و100 تُكمل الدوران إلى الشاشة. اضبط المسافة بين المفتاحين ونعومة الحركة للتحكم في الكشف، وتظل قيم الدوران اليدوي مضافة إلى الحركة.
Exit Progress
الافتراضي: 0 → 100
يظهر في With Animation فقط. 0 تعني أن الخروج لم يبدأ، و100 تعني اكتماله. حرّك المفتاحين لتحديد بداية الخروج وسرعته. للحركة الكاملة فعّل خيارَي الحركة التلقائية.
توقيت الحركة بالـKeyframes
تعتمد الحركة الآن على Keyframes فعلية، وليس على Markers. حدّد طبقة MAIN المتحركة داخل كومبوزيشن مشروعك واضغط U لإظهار الخصائص المتحركة. لكل خاصية Progress مفتاح يبدأ بقيمة 0 وآخر ينتهي بقيمة 100:
Entry Progress → Turn Progress → Exit Progress
Progress
الافتراضي
وظيفته وطريقة استخدامه
Entry Progress
0 → 1.8 s
من 0 إلى 100: دخول الهاتف من أسفل حتى استعراض ظهره.
Turn Progress
2.5 → 5.1 s
من 0 إلى 100: دوران الهاتف من الخلف حتى تظهر الشاشة.
Exit Progress
7.5 → 9.6 s
من 0 إلى 100: خروج الهاتف من الإطار مع الدوران.
قرّب مفتاحَي الحركة من بعضهما لتسريعها، أو أبعدهما لإبطائها. حرّك المفتاحين معًا لتغيير بداية المرحلة دون تغيير مدتها. مثال: اترك مفتاح 0 في Turn Progress عند 2.5 ثانية، وحرّك مفتاح 100 من 5.1 إلى 3.8 ثانية؛ تصبح مدة الدوران 1.3 بدلًا من 2.6 ثانية. المسافة بين Entry وTurn تحدّد مدة استعراض الظهر، وبين Turn وExit تحدّد مدة استعراض الشاشة. يمكنك تعديل نعومة الحركة من Graph Editor. الأوقات هنا محسوبة من بداية الحركة الافتراضية ذات العشر ثواني؛ وقد تُضغط عند الإضافة قرب نهاية كومبوزيشن قصير.
الإرجاع وفتح مشروع محفوظ
شغّل JSX مرة في كل جلسة After Effects لتفعيل إضافة التحكمات تلقائيًا وReset ومتابعة المدة. بعد فتح مشروع AEP محفوظ، حدّد طبقة MAIN الموجودة، وشغّل السكربت واختر وضع الحركة نفسه ليستخدم الموك أب الحالي. اختيار وضع مختلف قد ينشئ موك أب آخر أو يستخدم موك أب متوافقًا معه.
تظل التحكمات والـExpressions والـKeyframes الفعلية محفوظة في AEP. ومع تشغيل المساعد وتحديد MAIN، تحريك آخر مفاتيح الحركة قد يمدّ مدة الطبقة والمصادر الداخلية في حدود مدة الكومبوزيشن الأساسي. وجود Time Remap يدوي أو Stretch غير موجب يوقف تعديل المدة تلقائيًا.
يعيد Reset to Initial Setup إعدادات المظهر وموضع الطبقة عند الإضافة. وفي الوضع المتحرك يعيد Keyframes الـProgress الأولى، بينما يظل الوضع الثابت بلا حركة جاهزة. يحذف التحريك المخصص للخصائص التي يعيد ضبطها؛ احفظ أولًا إذا أردت الاحتفاظ بتعديلاتك. توجد نافذة إعداد عند التشغيل، ولا توجد نافذة التحكم العائمة القديمة Apply Controls / Reset.
حذف الموك أب بالكامل من المشروع
شغّل ملف JSX مرة أخرى.
من قسم Remove an existing mockup اختر الموك أب المطلوب من القائمة، وراجع عدد النسخ والعناصر المعروض.
اضغط Remove Mockup لحذف كل نسخ هذا الموك أب وعناصر المشروع التي أنشأها السكربت، وليس طبقة MAIN واحدة فقط.
شغّل السكربت مجددًا واختر With Animation أو Without Animation لإنشاء موك أب جديد.
يحتفظ بملفاتك المخصصة والعناصر المستخدمة في أجزاء أخرى من المشروع، وقد ينقلها إلى مجلد Preserved media - IP18PM_…. يمكن التراجع عن الحذف من Edit → Undo. الحذف يتم من مشروع AEP ولا يمس ملفات الأصول المستخرجة على القرص. حذف MAIN من التايملاين وحده يترك الكومبوزيشنز الداخلية موجودة.
الحفظ والمعاينة والتصدير
احفظ المشروع بنفسك بصيغة AEP، واحتفظ بمجلد iPhone18_ProMax_Assets_v4_0 وملفات الشاشة معه، بما يشمل BIN وملفات glTF وHDR. اسم مجلد الأصول يظل بهذا الشكل في v1.0.
تبدأ المعاينة بدقة Half والـMotion Blur مغلقًا. استخدم Full لمراجعة الجودة النهائية.
الموك أب بلا طبقة BACKGROUND. ضع خلفيتك أسفل MAIN، أو صدّر بصيغة وإعداد إخراج يدعمان RGB + Alpha للحفاظ على الشفافية.
حل المشكلات الشائعة
ظهور حواف مربعة أو مستطيلة حول الشاشة
غيّر دقة المعاينة من Full إلى Half أو من Half إلى Full، ثم عاين الفريم نفسه من جديد. بعد تحديث العرض يمكنك الرجوع إلى الدقة المطلوبة.
التحكمات أو Reset لا تستجيب
حدّد طبقة MAIN الموجودة، وشغّل JSX في الجلسة الحالية واختر وضع الحركة نفسه. افتح Effect Controls، واترك الكومبوزيشن والطبقة محدّدين ليعمل المساعد التلقائي.
لا تظهر مفاتيح Progress أو التحكمات التلقائية
راجع الوضع الذي اخترته؛ Without Animation لا يضيفها أصلًا. في With Animation حدّد MAIN واضغط U؛ وداخل MAIN حدّد PHONE - ANIMATE ME.
الهاتف لا يدخل أو يدور أو يخرج
راجع Automatic Rise And Turn وAutomatic Exit وأزواج Keyframes الـProgress الثلاثة، ثم نهاية الطبقة ومدة الكومبوزيشن الأساسي.
تظهر مشكلة عند إعادة التطبيق بعد حذف MAIN
استخدم Remove Mockup في نافذة الإعداد لحذف بنية الموك أب الذي اخترته من المشروع، ثم شغّل السكربت مجددًا.
Die aktualisierte Version meldet eine zufällige Installations-ID, Betriebssystem, After-Effects-Version und letzte Verbindung zu deinem Konto. Keine Projektdateien oder Computernamen werden übertragen. Entpackte Dateien zusammen behalten.
Eckige Bildschirmränder? Vorschau aktualisieren
Bei quadratischen Ecken oder rechteckigen Rändern die Vorschauauflösung von Full auf Half oder von Half auf Full umstellen und denselben Frame erneut ansehen. Danach kann die bevorzugte Auflösung wieder gewählt werden.
Dies ist die praktische Lösung für das gemeldete Vorschauproblem. Telefonform und Projektmaße bleiben gleich. Das Skript bereitet den Bildschirmausschnitt vor der 3D-Verknüpfung vor, erzwingt aber nach dem Aufbau keine automatische Aktualisierung. Vor dem Export denselben Frame in Full kontrollieren.
Was enthält der Download?
Ein JSX-Skript erstellt das bearbeitbare Mockup aus eingebettetem 3D-Modell, Licht und Expressions. Über das Skriptmenü ausführen, nicht in ein Expression-Feld einfügen. Der Download ist keine fertige AEP-Datei und keine installierbare Erweiterung.
After Effects 2025 (25.0) oder neuer mit Unterstützung für native 3D-Modelle.
ZIP in einen dauerhaften, beschreibbaren Ordner entpacken.
Unter Preferences → Scripting & Expressions die Option Allow Scripts to Write Files and Access Network aktivieren. Das Skript entpackt seine Assets neben der JSX-Datei.
Mockup erstellen
Zielkomposition öffnen und den Abspielkopf an den gewünschten Start setzen.
File → Scripts → Run Script File wählen und Launch_iPhone_Mockup.jsx öffnen.
Im Setup With Animation für die vorbereitete Bewegung oder Without Animation für ein statisches Telefon wählen. Schließen bricht den Vorgang ab.
Das eingebettete Ultimate-Plugins-Bild wird automatisch auf die Anzeige gelegt. Es gibt keinen Bildauswahldialog; später in REPLACE SCREEN austauschen.
IP18PM_001 - iPhone 18 Pro Max - MAIN wird am Abspielkopf eingefügt, eingepasst und ausgewählt. Ohne geeignete Zielkomposition öffnet sich MAIN. Die laufende Nummer kann abweichen.
MAIN auswählen und Window → Effect Controls öffnen. Innerhalb von MAIN liegen die Darstellungseinstellungen auf CONTROLS und die animierten Progress-Regler auf PHONE - ANIMATE ME.
Animiertes oder statisches Mockup wählen
With Animation: Entry-, Turn- und Exit-Keyframes sowie 15 Effect Controls auf MAIN einschließlich der drei Progress-Regler. Keine Bewegungsmarker.
Without Animation: statisches Telefon in Vorderansicht mit 10 manuellen Reglern, ohne vorbereitete Bewegungsschlüssel oder Bewegungsmarker. Automatic Rise And Turn, Automatic Exit und die drei Progress-Regler fehlen. Manuelle Regler können später selbst animiert werden.
Die Animation startet mit 10 Sekunden; eine statische Instanz kann die verbleibende Zielkomposition füllen. Beide haben einen transparenten Hintergrund.
Drei Ansichten des enthaltenen Modells; Vorschau außerhalb von After Effects gerendert.
Bildschirm austauschen
Unter 02 - EDIT SCREEN → REPLACE SCREEN die Ebene DEFAULT SCREEN - Ultimate Plugins auswählen. Ersatzbild oder -video mit Alt (Windows) bzw. Option (macOS) aus dem Projektfenster darauf ziehen. Die Verknüpfungen bleiben erhalten. Fit/Fill liest die aktuellen Medienmaße und passt sich einem anderen Seitenverhältnis an.
Alternativ eigene Ebenen hinzufügen und das Standardbild ausblenden. Kontur und Dynamic Island werden vom Mockup ausgeschnitten. Start, Ende und eventuelles Standbild oder Loop des Videos in REPLACE SCREEN einstellen. Der Inhalt wartet nicht automatisch auf die Vorderansicht.
MAIN-Instanzen haben eigene Regler und Bewegungs-Keyframes, teilen aber REPLACE SCREEN. Änderungen dieser Quelle betreffen alle zugehörigen Instanzen.
Alle Effect Controls
Zehn Regler sind in beiden Modi verfügbar. Automatic Rise And Turn, Automatic Exit sowie Entry, Turn und Exit Progress erscheinen nur bei With Animation. Progress liegt auf der MAIN-Ebene direkt in Effect Controls; innerhalb von MAIN auf PHONE - ANIMATE ME.
Phone Color
Standard: Burgundy
Wähle Burgundy, Glacier Blue, Silver oder Black. Nur das Gehäuse wechselt die Oberfläche; Bildschirm und Kameralinsen behalten ihre Farben.
Phone Size Percent
Standard: 100
Skaliert Telefon und Bildschirm gemeinsam im Mockup. 120 vergrößert um 20 %, 80 verkleinert um 20 %. Unabhängig von Transform > Scale der MAIN-Ebene.
Manual Y Rotation
Standard: 0°
Dreht das Telefon um die vertikale Achse. Der Winkel wird zur automatischen Drehung addiert. Für eine manuelle Drehung Automatic Rise And Turn deaktivieren.
Manual X Rotation
Standard: 0°
Neigt das Telefon nach vorne oder hinten, zusätzlich zur automatischen Neigung. Beginne beispielsweise mit 10°.
Manual Z Rotation
Standard: 0°
Dreht das Telefon in der Bildebene. Ein kleiner Winkel ergibt eine diagonale Bildkomposition; der Regler lässt sich auch mit Keyframes animieren.
Automatic Rise And Turn
Standard: On
Nur With Animation. Aktiviert Aufstieg und Drehung über Entry- und Turn-Progress-Keyframes. Deaktivieren für ein zentriertes, manuell gedrehtes Telefon. Auch der vollständige Ausstieg benötigt diesen Schalter.
Automatic Exit
Standard: On
Nur With Animation. Aktiviert den Ausstieg über Exit-Progress-Keyframes. Für die komplette Bewegung Automatic Rise And Turn eingeschaltet lassen. Deaktivieren hält das Telefon sichtbar.
Studio Light Intensity
Standard: 90
Steuert die Stärke von Umgebungslicht und Reflexionen am 3D-Telefon. Für hellere Glanzlichter schrittweise erhöhen; die Bildschirmmedien bleiben unverändert.
Studio Rotation
Standard: 0°
Dreht die Lichtumgebung und verschiebt dadurch die Reflexionen. Telefon und Kamera bleiben stehen. Probiere 45° oder 90° für andere Kantenlichter.
Screen Brightness Percent
Standard: 100
Steuert die Deckkraft der Bildschirmebene von 0 bis 100, nicht die Belichtung. 0 blendet den Inhalt aus, 100 zeigt ihn vollständig. Höhere Werte werden auf 100 begrenzt.
Fit Entire Screen Media
Standard: Off
Aus: Fill füllt den Bildschirm und kann Ränder beschneiden. Ein: Fit zeigt das gesamte Medium und kann freie Flächen lassen. Das Seitenverhältnis bleibt erhalten.
Reset to Initial Setup
Standard: Off
Einmal aktivieren; schaltet sich nach Reset aus. Stellt Darstellung und erfasste Platzierung, Timing, Skalierung, Drehung, Deckkraft und Parent von MAIN wieder her. Animierte Instanzen erhalten ursprüngliche Progress-Keyframes; statische bleiben statisch. Eigene Schlüssel/Expressions zurückgesetzter Eigenschaften werden entfernt, Medien bleiben. Der Sitzungshelfer muss aktiv sein.
Entry Progress
Standard: 0 → 100
Nur With Animation. 0 hält das Telefon unterhalb des Bilds, 100 beendet den Aufstieg zur Rückansicht. Die beiden Schlüssel steuern das Timing. Benötigt Automatic Rise And Turn.
Turn Progress
Standard: 0 → 100
Nur With Animation. 0 entspricht der Rückansicht, 100 der abgeschlossenen Drehung zur Anzeige. Abstand und Easing bearbeiten; manuelle Drehwerte werden weiterhin addiert.
Exit Progress
Standard: 0 → 100
Nur With Animation. 0 bedeutet noch kein Ausstieg, 100 dessen Abschluss. Das Paar bestimmt Start und Dauer. Für die gesamte Bewegung beide automatischen Schalter aktivieren.
Animation mit Keyframes takten
Die Bewegung verwendet jetzt native Keyframes statt Marker. Animiertes MAIN auswählen und U drücken. Jeder Progress-Regler bewegt sich von 0 zu 100:
Entry Progress → Turn Progress → Exit Progress
Progress
Standard
Funktion und Anwendung
Entry Progress
0 → 1.8 s
0 → 100: Aufstieg zur Rückansicht.
Turn Progress
2.5 → 5.1 s
0 → 100: Drehung zur Vorderseite.
Exit Progress
7.5 → 9.6 s
0 → 100: Ausstieg mit Drehung.
Keyframe-Paare zusammenschieben, um zu beschleunigen, oder auseinanderziehen, um zu verlangsamen. Beide gemeinsam verschieben ändert nur den Start. Beispiel: Turn Progress startet bei 2,5 s und endet bei 3,8 statt 5,1 s; die Drehung dauert dann 1,3 statt 2,6 s. Die Lücken zwischen Entry/Turn und Turn/Exit bilden die Haltephasen. Easing im Graph Editor bearbeiten. Die Tabelle gilt relativ zum Start der 10-Sekunden-Animation; bei wenig verbleibender Zeit werden die Anfangszeiten komprimiert.
Zurücksetzen und erneut öffnen
JSX einmal pro After-Effects-Sitzung ausführen, um automatische Reglerzuweisung, Reset und Daueranpassung zu aktivieren. Nach dem Öffnen einer AEP vorhandenes MAIN auswählen und denselben Animationsmodus wählen. Ein anderer Modus kann ein anderes kompatibles Mockup verwenden oder erstellen.
Verknüpfte Regler, Expressions und native Keyframes bleiben in der AEP erhalten. Bei aktivem Helfer und ausgewähltem MAIN kann das Verschieben der letzten Bewegungsschlüssel Ebene und Quellen verlängern, begrenzt durch die Zielkomposition. Manuelles Time Remap oder nicht positiver Stretch deaktiviert diese Anpassung.
Reset stellt Darstellung und ursprüngliche Ebenenplatzierung zurück. Animierte Mockups erhalten ihre ursprünglichen Progress-Keyframes; statische bleiben statisch. Eigene Animation der zurückgesetzten Eigenschaften wird entfernt. Vorher speichern. Es gibt einen Setup-Dialog, aber kein altes schwebendes Apply-Controls-/Reset-Fenster.
Mockup vollständig aus dem Projekt entfernen
JSX erneut ausführen.
Unter Remove an existing mockup das gewünschte Mockup wählen und die Anzahl der Instanzen und Elemente prüfen.
Remove Mockup entfernt alle Instanzen dieses Mockups und seine erzeugten Projektelemente.
JSX erneut ausführen und einen Modus für einen frischen Aufbau wählen.
Eigene Medien und anderswo verwendete Ressourcen bleiben erhalten, eventuell im Ordner Preserved media - IP18PM_…. Edit → Undo macht die Entfernung rückgängig. Dateien auf dem Laufwerk werden nicht gelöscht. Nur MAIN aus der Timeline zu löschen lässt die Quellkompositionen bestehen.
Speichern, Vorschau und Export
AEP selbst speichern und den gesamten Ordner iPhone18_ProMax_Assets_v4_0 einschließlich BIN, glTF und HDR sowie die Bildschirmmedien behalten. Dieser Ordnername bleibt in v1.0 bestehen.
Die Vorschau startet mit Half und deaktiviertem Motion Blur. Für die Endkontrolle Full wählen.
Keine BACKGROUND-Ebene: Hintergrund unter MAIN legen oder mit einem RGB-+-Alpha-fähigen Format und entsprechenden Einstellungen exportieren.
Häufige Fragen
Eckige Ränder an der Anzeige
Vorschau von Full auf Half oder Half auf Full umstellen, denselben Frame erneut ansehen und danach zur gewünschten Auflösung zurückkehren.
Regler oder Reset reagieren nicht
Vorhandenes MAIN auswählen, JSX ausführen, denselben Modus wählen und Effect Controls öffnen. Komposition und Ebene ausgewählt lassen.
Progress-Keyframes fehlen
Without Animation enthält absichtlich keine. Im animierten Modus MAIN auswählen und U drücken; innerhalb von MAIN PHONE - ANIMATE ME wählen.
Telefon bewegt sich nicht
Automatische Schalter, Progress-Keyframe-Paare, Ebenenende und Kompositionsdauer prüfen.
Fehler nach dem Löschen von MAIN
Remove Mockup im Setup verwenden und anschließend JSX erneut ausführen.
Bildschirm wird transparent
Screen Brightness Percent verändert Deckkraft. Belichtung in REPLACE SCREEN korrigieren.
La versión actualizada vincula un ID aleatorio de instalación, sistema operativo, versión de After Effects y última conexión a tu cuenta. No envía proyectos ni el nombre del equipo. Conserva juntos los archivos extraídos.
¿Bordes cuadrados? Actualiza la vista previa
Si aparecen esquinas cuadradas o un borde rectangular alrededor de la pantalla, cambia la resolución de vista previa de Full a Half o de Half a Full y vuelve a previsualizar el mismo fotograma. Después puedes regresar a tu resolución preferida.
Es la solución práctica al problema de vista previa observado. No cambia la forma del teléfono ni el tamaño del proyecto. El script prepara el recorte antes de conectarlo a la escena 3D, pero no fuerza una actualización automática tras construirla. Revisa ese fotograma en Full antes de exportar.
Qué incluye la descarga
Este script JSX construye un mockup editable con modelo 3D, iluminación y expresiones integrados. Ejecútalo desde el menú de scripts; no lo pegues en una expresión. No es un AEP ya construido ni una extensión instalable.
MAIN: 1080 × 1920, 30 fps, 10 segundos y fondo transparente. REPLACE SCREEN: 1320 × 2868.
Antes de empezar
After Effects 2025 (25.0) o posterior con soporte nativo de modelos 3D.
Extrae el ZIP en una carpeta permanente con permiso de escritura.
Activa Allow Scripts to Write Files and Access Network en Preferences → Scripting & Expressions. El script extrae sus recursos junto al JSX.
Crea tu primer mockup
Abre la composición de destino y sitúa el cabezal en el inicio deseado.
Elige File → Scripts → Run Script File y abre Launch_iPhone_Mockup.jsx.
Selecciona With Animation para el movimiento preparado o Without Animation para un teléfono estático. Cerrar la ventana cancela la operación.
La imagen de Ultimate Plugins se carga automáticamente. No aparece un selector de imagen; sustitúyela después dentro de REPLACE SCREEN.
El script inserta IP18PM_001 - iPhone 18 Pro Max - MAIN en el cabezal, lo adapta al encuadre y lo selecciona. Sin una composición adecuada, abre MAIN. El prefijo numérico puede variar.
Selecciona MAIN y abre Window → Effect Controls. Dentro de MAIN, los ajustes visuales están en CONTROLS y las propiedades Progress animadas en PHONE - ANIMATE ME.
Elige un mockup animado o estático
With Animation: añade keyframes de entrada, giro y salida y 15 Effect Controls en MAIN, incluidos los tres Progress. No crea marcadores de movimiento.
Without Animation: teléfono estático frontal con 10 controles manuales, sin keyframes preparados ni marcadores. No incluye Automatic Rise And Turn, Automatic Exit ni los tres Progress. Puedes animar los controles manuales después.
La animación empieza con 10 segundos. Una instancia estática puede ocupar el tiempo restante de la composición de destino. Ambos modos tienen fondo transparente.
Tres vistas del modelo incluido; vista previa renderizada fuera de After Effects.
Sustituye la pantalla
Abre 02 - EDIT SCREEN → REPLACE SCREEN y selecciona DEFAULT SCREEN - Ultimate Plugins. Arrastra el nuevo medio desde Project con Alt (Windows) u Option (macOS) sobre esa capa. Conserva las conexiones. Fit/Fill lee las dimensiones actuales, por lo que se adapta a un cambio de proporción.
También puedes añadir capas y ocultar la imagen predeterminada. El mockup recorta el contorno y Dynamic Island. Ajusta el inicio, final y cualquier congelación o bucle del vídeo dentro de REPLACE SCREEN. El contenido no espera automáticamente a la vista frontal.
Las instancias MAIN tienen controles y keyframes de movimiento independientes, pero comparten REPLACE SCREEN. Modificar esa fuente afecta a todas las que la usan.
Todos los Effect Controls
Diez controles están disponibles en ambos modos. Automatic Rise And Turn, Automatic Exit, Entry Progress, Turn Progress y Exit Progress solo aparecen con With Animation. Progress está directamente en Effect Controls de MAIN; dentro de la composición fuente, en PHONE - ANIMATE ME.
Phone Color
Inicial: Burgundy
Elige Burgundy, Glacier Blue, Silver o Black. Cambia el acabado del teléfono sin teñir la pantalla ni las lentes.
Phone Size Percent
Inicial: 100
Escala juntos el teléfono y su pantalla dentro del mockup. 120 aumenta un 20 % y 80 reduce un 20 %. Es independiente de Transform > Scale de MAIN.
Manual Y Rotation
Inicial: 0°
Gira el teléfono sobre su eje vertical. El ángulo se suma al giro automático. Desactiva Automatic Rise And Turn para controlar el giro manualmente.
Manual X Rotation
Inicial: 0°
Inclina el teléfono hacia delante o atrás, sumándose a la inclinación automática. Empieza con un valor suave, por ejemplo 10°.
Manual Z Rotation
Inicial: 0°
Rota el teléfono en el plano de la imagen. Usa un ángulo suave para una composición diagonal o anímalo con fotogramas clave.
Automatic Rise And Turn
Inicial: On
Solo With Animation. Activa entrada y giro mediante los keyframes Entry Progress y Turn Progress. Desactívalo para un teléfono centrado con giro manual. La salida completa también depende de este interruptor.
Automatic Exit
Inicial: On
Solo With Animation. Activa la salida según Exit Progress. Mantén Automatic Rise And Turn activo para la salida completa; desactiva Automatic Exit para conservar el teléfono visible.
Studio Light Intensity
Inicial: 90
Ajusta la intensidad de la iluminación y los reflejos del teléfono 3D. Aumenta gradualmente los brillos; no cambia el contenido de la pantalla.
Studio Rotation
Inicial: 0°
Gira el entorno de luz para desplazar los reflejos sin mover el teléfono ni la cámara. Prueba 45° o 90° para cambiar los brillos de los bordes.
Screen Brightness Percent
Inicial: 100
Controla la opacidad de la pantalla entre 0 y 100, no la exposición. 0 oculta el contenido y 100 lo muestra por completo. Los valores superiores se limitan a 100.
Fit Entire Screen Media
Inicial: Off
Desactivado: Fill llena la pantalla y puede recortar bordes. Activado: Fit muestra todo el contenido y puede dejar espacio libre. Mantiene la proporción original.
Reset to Initial Setup
Inicial: Off
Actívalo una vez; se desactiva al finalizar. Restaura apariencia y posición, tiempos, escala, rotación, opacidad y parent iniciales de MAIN. Restablece Progress keyframes en modo animado; el estático sigue estático. Elimina claves/expresiones de propiedades restablecidas sin sustituir medios. Requiere el ayudante de la sesión.
Entry Progress
Inicial: 0 → 100
Solo With Animation. 0 deja el teléfono bajo el encuadre; 100 completa la entrada a la vista trasera. Mueve las dos claves para ajustar el tiempo. Requiere Automatic Rise And Turn.
Turn Progress
Inicial: 0 → 100
Solo With Animation. 0 corresponde a la fase trasera y 100 completa el giro a la pantalla. Ajusta separación y easing; los valores manuales de giro siguen sumándose.
Exit Progress
Inicial: 0 → 100
Solo With Animation. 0 indica que la salida no ha empezado y 100 que está completa. Mueve el par para cambiar inicio y duración. Activa ambos interruptores para la salida completa.
Anima con keyframes
La animación utiliza keyframes nativos, no marcadores. Selecciona el MAIN animado y pulsa U. Cada control Progress pasa de 0 a 100:
Entry Progress → Turn Progress → Exit Progress
Progress
Inicial
Función y uso
Entry Progress
0 → 1.8 s
0 → 100: entrada desde abajo mostrando la parte trasera.
Turn Progress
2.5 → 5.1 s
0 → 100: giro hasta mostrar la pantalla.
Exit Progress
7.5 → 9.6 s
0 → 100: salida con giro.
Acerca cada par de keyframes para acelerar o sepáralo para ralentizar. Mover ambos juntos desplaza la fase sin cambiar su duración. Con Turn Progress empezando en 2,5 s y terminando en 3,8 en vez de 5,1 s, el giro dura 1,3 en lugar de 2,6 s. Los huecos entre Entry/Turn y Turn/Exit son las pausas trasera y frontal. Edita el easing en Graph Editor. Los tiempos son locales a la animación de 10 segundos; se comprimen si queda poco tiempo en la composición de destino.
Restablecer y reabrir
Ejecuta JSX una vez por sesión para activar la conexión automática de controles, Reset y el ajuste de duración. Al reabrir un AEP, selecciona el MAIN existente y el mismo modo de animación. Otro modo puede crear o reutilizar un mockup compatible diferente.
Los controles vinculados, expresiones y keyframes nativos permanecen guardados. Con el ayudante activo y MAIN seleccionado, mover los últimos keyframes puede ampliar la capa y sus fuentes hasta el límite de la composición de destino. Time Remap manual o Stretch no positivo desactivan ese ajuste.
Reset restaura apariencia y colocación inicial. En el modo animado restaura también los Progress keyframes originales; el estático permanece estático. Elimina la animación personalizada de las propiedades restablecidas. Guarda antes. Existe una ventana de configuración, pero no la antigua ventana flotante Apply Controls / Reset.
Eliminar completamente el mockup del proyecto
Ejecuta JSX de nuevo.
En Remove an existing mockup, elige el mockup y comprueba el número de instancias y elementos.
Remove Mockup elimina todas las instancias del mockup elegido y sus elementos generados.
Ejecuta JSX otra vez y selecciona un modo para empezar de nuevo.
Conserva medios personalizados y recursos usados en otros lugares, a veces en Preserved media - IP18PM_…. Edit → Undo revierte la eliminación. No borra los recursos del disco. Quitar solo MAIN de la línea de tiempo deja sus composiciones fuente.
Guardar, previsualizar y exportar
Guarda el AEP y conserva iPhone18_ProMax_Assets_v4_0 completo —BIN, glTF y HDR— junto con los medios de pantalla. v1.0 mantiene ese nombre de carpeta.
La vista previa empieza en Half y sin Motion Blur. Usa Full para revisar la calidad final.
No hay capa BACKGROUND. Añade tu fondo debajo de MAIN o exporta con un formato y configuración compatibles con RGB + Alpha.
Preguntas frecuentes
Aparecen bordes cuadrados en la pantalla
Cambia de Full a Half o de Half a Full y previsualiza el mismo fotograma. Después regresa a tu resolución preferida.
Los controles o Reset no responden
Selecciona el MAIN existente, ejecuta JSX, elige el mismo modo y abre Effect Controls. Mantén seleccionadas la composición y la capa.
Faltan los keyframes Progress
Without Animation no los incluye. En modo animado, selecciona MAIN y pulsa U; dentro de MAIN selecciona PHONE - ANIMATE ME.
El teléfono no se mueve
Revisa los interruptores automáticos, los pares de keyframes Progress, el final de capa y la duración de composición.
Falla al ejecutar tras borrar MAIN
Utiliza Remove Mockup en la configuración y después ejecuta JSX de nuevo.
La pantalla se vuelve transparente
Screen Brightness Percent controla opacidad. Corrige exposición dentro de REPLACE SCREEN.