How to isolate people with Object Matte in After Effects
Select a person with AI, repair missed areas, preserve hair and motion blur, propagate the matte through the shot, then freeze it for reliable compositing.
دليل كومبوزيتنج في After Effects
شرح عزل الشخصيات باستخدام Object Matte في After Effects
حدد الشخص بالذكاء الاصطناعي، وعالج المناطق الناقصة، وحافظ على الشعر والـMotion Blur، ثم انشر العزل عبر اللقطة واضغط Freeze للحصول على نتيجة ثابتة.
Guía de composición en After Effects
Cómo aislar personas con Object Matte en After Effects
Selecciona una persona con IA, corrige las zonas perdidas, conserva el cabello y el desenfoque de movimiento, propaga el matte y congélalo para componer.
Compositing-Anleitung für After Effects
Personen mit Object Matte in After Effects freistellen
Wähle eine Person per KI aus, korrigiere fehlende Bereiche, erhalte Haare und Bewegungsunschärfe, propagiere die Matte und friere sie für zuverlässiges Compositing ein.
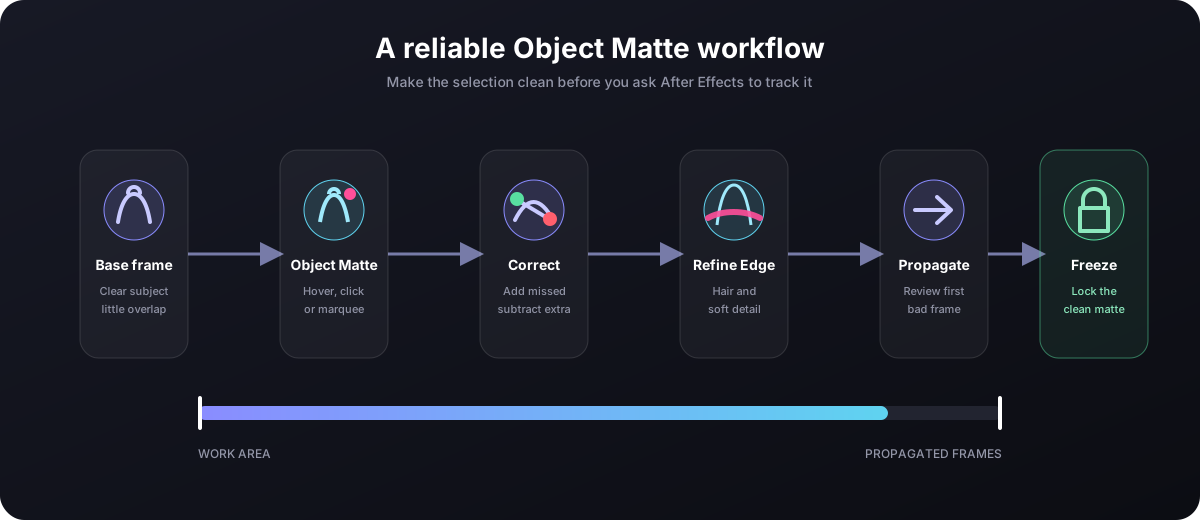
Open the footage in the Layer panel, choose Object Matte Tool, hover and click the person, repair the selection with Quick Selection or Selection Brush, paint over hair with Refine Edge, propagate through the shot, review the first bad frame, then press Freeze.
What changed in the latest After Effects?
Adobe introduced the AI-powered Object Matte suite in After Effects 26.2. The current stable release is 26.3. Object Matte adds a one-click subject selection workflow while keeping manual tools for difficult areas. Version 26.3 also improves smooth magnification in the Layer panel and fixes Object Matte stability and aerender issues.
Stable vs Beta
Disk caching for propagated Object Matte frames is currently a Beta feature. In stable 26.3, finish the propagation and use Freeze before you rely on the result for final compositing or rendering.
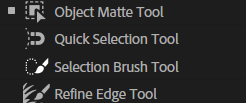
The four tools inside the Object Matte flyout in After Effects 26.3.
Complete workflow: put text or graphics behind a person
Duplicate the footage. Keep one clean copy for the background and use the second copy for the isolated person.
Place the isolated copy on top. The correct stack is: isolated person at the top, text or graphic in the middle, original footage at the bottom.
Pre-compose the isolation copy if you want a cleaner timeline. Pre-composing is useful for organization and for keeping the matte workflow separate, but Object Matte does not require it.
Open the actual footage layer. Enter the pre-comp if you made one, then double-click the footage so it opens in the Layer panel. Object Matte selection is not painted in the Composition panel.
Choose a strong base frame. Start where the full person is visible, sharp and not heavily covered by another object. A clean base frame improves every propagated frame.
Select Object Matte Tool. Hover over the person to preview the AI selection, then click. You can also drag a Rectangle or Lasso marquee around the subject.
Correct the main silhouette. Use Quick Selection for color- and edge-aware adjustments. Use Selection Brush for precise add/subtract strokes; hold Alt on Windows or Option on macOS to subtract.
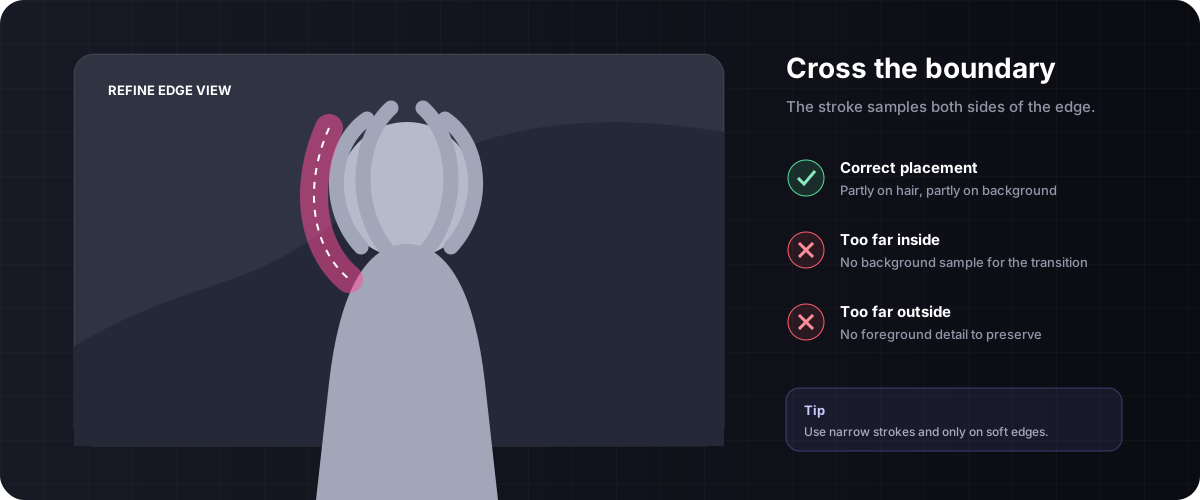
Refine hair and soft details. Paint a narrow Refine Edge stroke across the boundary—partly inside the person and partly over the background. Do not paint the entire body.
Propagate and review. Press Spacebar, move the CTI, or step frame by frame. Correct the first frame where the matte fails; that correction can then propagate forward or backward.
Freeze only after review. When the complete work area is clean, click Freeze at the bottom of the Layer panel. Return to the main composition and place your text or visual between the two video copies.
1Isolated person Object Matte resultTop
2Text, logo or graphic The element that should pass behind the personMiddle
The fastest starting point. Hover to preview the detected object, click to select it, or use Rectangle/Lasso selection when several objects overlap.
Best for: a clean, obvious subject
Quick Selection Tool
A faster, reimagined Roto Brush. Click or drag and After Effects expands the selection using color, contrast and visible edges. Live Update displays the result while you paint.
Best for: large missed regions
Selection Brush Tool
Manual additive and subtractive strokes with clearer cursor feedback. Use it when the AI includes a background patch or loses a hand, sleeve or gap between limbs.
Best for: controlled corrections
Refine Edge Tool
Paint only over soft or intricate boundaries such as hair, fur, semi-transparent fabric and motion-blurred fingers. It estimates partial transparency instead of forcing a hard cut.
Best for: hair and soft edges
Refine Edge is not a general selection brush
Use Object Matte, Quick Selection or Selection Brush to define what is inside or outside the subject. Use Refine Edge only on the transition zone that needs partial transparency.
A useful Refine Edge stroke crosses the boundary; it should not sit entirely inside the hair or entirely in the background.
Important matte and edge controls
Control
What it changes
Practical use
Feather
Softens the matte across the boundary.
Use small values to remove a cut-out look. Too much creates a halo.
Contrast
Tightens the soft transition.
Increase gently after Feather if the edge looks washed out.
Shift Edges
Expands positive or contracts negative.
Use a slight negative value to remove bright background fringes.
Reduce Chatter
Stabilizes edges across adjacent frames.
Raise it when a stationary edge flickers; lower it if the matte cannot follow fast motion.
Base Refine Edge Radius
Extends the refined zone created by Refine Edge strokes.
Useful when the original refine stroke was too narrow.
Smooth
Smooths curves along the boundary.
Keep it low for hair and sharp clothing details.
Motion Blur
Renders the matte with motion blur.
High quality is slower but cleaner on fast hands and moving limbs.
Decontaminate Edge Colors
Removes background color contamination from translucent edge pixels.
Use for green/bright halos in hair; inspect carefully because it changes edge color.
Increase Radius / View Map
Expands the color-cleaning region / shows affected pixels.
Use View Map before increasing the radius too far.
Propagation, view modes and Freeze
After Effects propagates the selection as you play, move the CTI or step frame by frame. Green timeline segments indicate propagated Object Matte frames. For difficult shots, work in short ranges and inspect the result in more than one view:
Alpha: the matte as grayscale. Shortcut Alt/Option + 4.
Alpha Boundary: the original image with the segmentation outline. Shortcut Alt/Option + 5.
Alpha Overlay: the foreground stays visible while the excluded area is covered by a color. Shortcut Alt/Option + 6.
Freeze locks and caches the segmentation so After Effects does not need to propagate it again whenever the project changes or reopens. If you must change a selection stroke after freezing, unfreeze, correct the matte, propagate the affected range again, and refreeze.
Common problems and fixes
Hair looks hard
Use a narrow Refine Edge stroke, keep Smooth low, then tune Feather, Contrast and Decontaminate Edge Colors.
Edge flickers
Correct the first failing frame and raise Reduce Chatter slightly. Do not add unnecessary strokes on every frame.
Matte loses a hand
Add it with Selection Brush on the first bad frame. Increase the search area only if the motion leaves the analyzed region.
Bright halo
Contract Shift Edges slightly and use edge-color decontamination. Avoid excessive Feather.
Propagation is slow
Trim the layer/work area, work at matching source frame rate, use Full resolution for final corrections, and freeze only the range you need.
Cannot paint
Confirm that the footage is open in the Layer panel, the layer is not a still image, and the matte is not currently frozen.
Object Matte or Roto Brush 3?
Choose
When
Object Matte
You have a recognizable person or object and want the fastest one-click starting point plus lightweight corrections.
Roto Brush 3
You need a traditional stroke-driven workflow, detailed propagation controls, multiple corrective spans, or the Object Matte selection keeps failing.
Masks / Keying
Use masks for simple rigid shapes; use Keylight when the footage was shot against a controlled green or blue screen.
Professional tips
Choose the cleanest base frame, not necessarily the first frame.
Use the fewest strokes possible. Each stroke is guidance, not paint that must cover the person.
Correct the earliest bad frame so the fix can influence later propagation.
Match the comp frame rate to the source footage before detailed roto work.
Review edges over the actual replacement background; a matte can look fine on transparency and fail over white or saturated colors.
Keep the untouched original footage in the comp until the shot is approved.
افتح الكليب داخل Layer Panel، واختر Object Matte Tool، ثم مرر المؤشر فوق الشخص واضغط لتحديده. أصلح المناطق الناقصة باستخدام Quick Selection أو Selection Brush، وحدد الشعر والحواف الدقيقة باستخدام Refine Edge، ثم نفذ الـPropagation وراجع أول فريم يظهر فيه خطأ، وبعدها اضغط Freeze.
ما الجديد في آخر تحديث من After Effects؟
قدمت Adobe مجموعة Object Matte المدعومة بالذكاء الاصطناعي في إصدار After Effects 26.2، بينما أحدث إصدار مستقر حاليًا هو 26.3. تتيح لك الأداة تحديد الشخص بضغطة واحدة، مع الاحتفاظ بأدوات يدوية لمعالجة الشعر والمناطق المعقدة. كما حسّن إصدار 26.3 أداء التكبير داخل Layer Panel وعالج مشكلات في الثبات والرندر باستخدام aerender.
النسخة المستقرة والـBeta
حفظ نتائج Object Matte على القرص ما زال ميزة تجريبية في نسخة Beta. داخل الإصدار المستقر 26.3 أكمل الـPropagation واضغط Freeze قبل الاعتماد على النتيجة في الكومبوزيتنج أو الرندر النهائي.
الأدوات الأربع الموجودة داخل قائمة Object Matte في After Effects 26.3.
الطريقة الكاملة لوضع نص أو عنصر خلف الشخص
كرر الكليب. احتفظ بنسخة أصلية كاملة للخلفية، واستخدم النسخة الثانية لعزل الشخص.
ضع نسخة الشخص المعزولة في الأعلى. الترتيب الصحيح هو: الشخص المعزول أعلى التايملاين، ثم النص أو العنصر في المنتصف، ثم الكليب الأصلي في الأسفل.
ضع نسخة العزل داخل Pre-comp إذا أردت تايملاين أنظف. الـPre-compose مفيد للتنظيم وفصل عملية العزل، لكنه ليس شرطًا لتشغيل Object Matte.
افتح طبقة الفيديو نفسها. ادخل إلى الـPre-comp إن أنشأته، ثم اضغط مرتين على الكليب ليفتح في Layer Panel. لا يتم رسم تحديد Object Matte داخل Composition Panel.
اختر Base Frame واضحًا. ابدأ بفريم يظهر فيه الشخص كاملًا وبوضوح ومن دون أن يغطيه عنصر آخر. جودة هذا الفريم تؤثر في بقية اللقطة.
اختر Object Matte Tool. مرر المؤشر فوق الشخص لمعاينة التحديد، ثم اضغط. ويمكنك استخدام Rectangle أو Lasso لرسم نطاق حول الشخص.
صحح شكل الشخص الأساسي. استخدم Quick Selection للمناطق الكبيرة المعتمدة على اللون والحواف، واستخدم Selection Brush للإضافة والحذف بدقة. اضغط Alt في Windows أو Option في macOS أثناء الرسم للحذف من التحديد.
حسن الشعر والحواف الناعمة. باستخدام Refine Edge ارسم شريطًا ضيقًا يمر فوق الحد الفاصل؛ جزء منه داخل الشعر وجزء فوق الخلفية. لا ترسم على جسم الشخص كله.
نفذ Propagation وراجع النتيجة. اضغط Spacebar أو حرك مؤشر الزمن أو تقدم فريمًا فريمًا. أصلح أول فريم يبدأ فيه الخطأ، حتى ينتقل التصحيح إلى الفريمات التالية أو السابقة.
اضغط Freeze بعد المراجعة الكاملة. عندما تتأكد من نظافة كل الفريمات داخل Work Area، اضغط Freeze أسفل Layer Panel، ثم عد إلى الكومبوزيشن الرئيسي وضع النص أو العنصر بين نسختي الفيديو.
1الشخص المعزول نتيجة Object Matteفي الأعلى
2النص أو اللوجو أو العنصر العنصر المطلوب وضعه خلف الشخصفي المنتصف
3الكليب الأصلي نسخة الخلفية بدون تعديلفي الأسفل
الترتيب المضمون: تحديد، تصحيح، تحسين الحواف، Propagation، مراجعة، ثم Freeze.
شرح كل أدوات Object Matte
Object Matte Tool
أسرع نقطة بداية. مرر المؤشر لمعاينة العنصر الذي تعرف عليه After Effects، ثم اضغط لتحديده. ويمكن استخدام Rectangle أو Lasso عند تداخل أكثر من عنصر.
الأفضل لشخص واضح ومميز
Quick Selection Tool
نسخة أسرع ومعاد تصميمها من فكرة Roto Brush. اضغط أو اسحب فوق المنطقة، وسيتم توسيع التحديد اعتمادًا على اللون والتباين والحواف، مع ظهور النتيجة مباشرة عبر Live Update.
الأفضل للمناطق الكبيرة الناقصة
Selection Brush Tool
فرشاة يدوية للإضافة والحذف بدقة. استخدمها إذا تم اختيار جزء من الخلفية أو فقد التحديد يدًا أو كمًا أو المسافة بين الذراع والجسم.
الأفضل للتصحيحات الدقيقة
Refine Edge Tool
تستخدم فقط فوق الحواف الناعمة والمعقدة مثل الشعر والفرو والقماش الشفاف والأصابع التي تحتوي على Motion Blur. تحافظ على الشفافية الجزئية بدل قص الحافة بشكل حاد.
الأفضل للشعر والحواف الناعمة
Refine Edge ليست فرشاة تحديد عامة
استخدم Object Matte أو Quick Selection أو Selection Brush لتحديد ما ينتمي إلى الشخص وما ينتمي إلى الخلفية. استخدم Refine Edge فقط في منطقة الانتقال التي تحتوي على تفاصيل أو شفافية جزئية.
تمر ضربة Refine Edge الصحيحة فوق الحد الفاصل، وليس داخل الشعر بالكامل أو فوق الخلفية بالكامل.
أهم إعدادات تحسين الـMatte والحواف
الإعداد
وظيفته
استخدامه عمليًا
Feather
يجعل الحد الفاصل أكثر نعومة.
استخدم قيمة صغيرة لإزالة شكل القص الحاد؛ الزيادة الكبيرة تصنع هالة.
Contrast
يشد منطقة الانتقال الناعمة.
ارفعه قليلًا بعد Feather إذا أصبحت الحافة باهتة.
Shift Edges
يوسع الحافة بالقيمة الموجبة أو يقلصها بالسالبة.
قيمة سالبة بسيطة تساعد في حذف أطراف الخلفية المضيئة.
Reduce Chatter
يثبت الحواف بين الفريمات المتجاورة.
ارفعه إذا اهتزت حافة ثابتة، وخفضه إذا لم تلحق الحافة بالحركة السريعة.
Base Refine Edge Radius
يوسع منطقة التحسين التي رسمتها باستخدام Refine Edge.
مفيد عندما تكون الفرشاة المستخدمة ضيقة أكثر من اللازم.
Smooth
ينعم المنحنيات على طول الحافة.
حافظ على قيمة منخفضة مع الشعر والتفاصيل الحادة.
Motion Blur
يضيف Motion Blur إلى الـMatte.
High Quality أبطأ لكنه أنظف مع اليدين والأطراف السريعة.
Decontaminate Edge Colors
ينظف لون الخلفية المتسرب إلى بكسلات الحواف الشفافة.
مفيد للهالة الخضراء أو الفاتحة حول الشعر، لكن راقب تغير الألوان.
Increase Radius / View Map
يوسع نطاق تنظيف اللون أو يعرض البكسلات المتأثرة.
استخدم View Map قبل توسيع النطاق بدرجة كبيرة.
الـPropagation وطرق العرض وFreeze
ينشر After Effects التحديد عبر الفريمات عند تشغيل الفيديو أو تحريك CTI أو الانتقال فريمًا فريمًا. تمثل الأجزاء الخضراء في التايملاين الفريمات التي تم تحليلها. مع اللقطات الصعبة، اعمل على أجزاء قصيرة وافحص النتيجة بأكثر من طريقة:
Alpha: عرض الـMatte بالأبيض والأسود. الاختصار Alt/Option + 4.
Alpha Boundary: عرض الصورة الأصلية مع خط التحديد. الاختصار Alt/Option + 5.
Alpha Overlay: إبقاء الشخص ظاهرًا وتلوين المنطقة المستبعدة. الاختصار Alt/Option + 6.
يعمل Freeze على قفل وتخزين نتيجة الـSegmentation حتى لا يعيد After Effects تحليلها مع كل تعديل أو عند فتح المشروع. إذا احتجت إلى تغيير ضربة تحديد بعد Freeze، قم بإلغاء التجميد، وصحح التحديد، وأعد Propagation للجزء المتأثر، ثم اضغط Freeze من جديد.
أشهر المشاكل وحلولها
الشعر يبدو مقصوصًا
استخدم Refine Edge بضربة ضيقة، واجعل Smooth منخفضًا، ثم اضبط Feather وContrast وDecontaminate Edge Colors.
الحافة تهتز
صحح أول فريم يظهر فيه الخطأ، وارفع Reduce Chatter قليلًا. لا ترسم ضربات غير ضرورية في كل فريم.
الأداة تفقد اليد
أضفها باستخدام Selection Brush في أول فريم خاطئ، وزد مساحة البحث فقط إذا خرجت الحركة من المنطقة التي يتم تحليلها.
هالة فاتحة حول الشخص
استخدم قيمة سالبة بسيطة في Shift Edges ثم نظف ألوان الحافة، وتجنب Feather المبالغ فيه.
التحليل بطيء
قص مدة الطبقة وWork Area، وطابق Frame Rate مع المصدر، واستخدم Full Resolution عند التصحيح النهائي، واعزل المدة المطلوبة فقط.
لا أستطيع الرسم
تأكد أن الفيديو مفتوح داخل Layer Panel، وأنه ليس صورة ثابتة، وأن نتيجة العزل ليست في وضع Freeze.
متى أستخدم Object Matte ومتى أستخدم Roto Brush 3؟
الأداة
متى تستخدمها؟
Object Matte
عندما يكون الشخص أو العنصر واضحًا وتريد أسرع بداية بضغطة واحدة مع تصحيحات محدودة.
Roto Brush 3
عندما تحتاج تحكمًا تقليديًا بالفرشاة وإعدادات Propagation أعمق وCorrective Spans متعددة، أو عندما يفشل Object Matte باستمرار.
Masks / Keying
استخدم Masks للأشكال البسيطة والصلبة، واستخدم Keylight إذا تم تصوير الفيديو أمام Green Screen أو Blue Screen مضبوط.
نصائح احترافية
اختر أوضح Base Frame، وليس بالضرورة أول فريم في الكليب.
استخدم أقل عدد ممكن من الضربات؛ الضربة تعطي الأداة معلومة وليست تلوينًا يجب أن يغطي الشخص كله.
صحح أول فريم يبدأ عنده الخطأ حتى يؤثر التصحيح في الفريمات التالية.
طابق Frame Rate في الكومبوزيشن مع الفيديو قبل بدء العزل الدقيق.
راجع الحواف فوق الخلفية النهائية، لأن نتيجة تبدو جيدة فوق الشفافية قد تفشل فوق خلفية بيضاء أو مشبعة.
احتفظ بنسخة الكليب الأصلية بدون تعديل حتى تعتمد اللقطة.
Abre el metraje en el panel Layer, elige Object Matte Tool, pasa el cursor y selecciona a la persona. Corrige con Quick Selection o Selection Brush, pinta el cabello con Refine Edge, propaga el matte, revisa el primer fotograma defectuoso y pulsa Freeze.
¿Qué cambió en la última versión?
Adobe introdujo Object Matte con IA en After Effects 26.2. La versión estable actual es 26.3. Object Matte ofrece selección de sujeto con un clic y herramientas manuales para zonas difíciles. La versión 26.3 también mejora la ampliación suave en el panel Layer y corrige problemas de estabilidad y aerender.
Estable frente a Beta
La caché en disco de los fotogramas propagados sigue siendo una función Beta. En 26.3 estable, completa la propagación y pulsa Freeze antes de depender del resultado para composición o render final.
Las cuatro herramientas del grupo Object Matte en After Effects 26.3.
Flujo completo para colocar texto detrás de una persona
Duplica el metraje. Conserva una copia limpia como fondo y usa la segunda para la persona aislada.
Coloca la copia aislada arriba. Orden: persona aislada, texto o gráfico, metraje original.
Precompón la copia de aislamiento si quieres una línea de tiempo limpia. Es útil para organizar, pero Object Matte no lo necesita.
Abre la capa real. Entra en la precomp y haz doble clic en el metraje para abrirlo en el panel Layer.
Elige un buen fotograma base. La persona debe estar visible, enfocada y con poca oclusión.
Selecciona Object Matte Tool. Pasa el cursor para previsualizar y haz clic; también puedes usar Rectangle o Lasso.
Corrige la silueta. Quick Selection sirve para regiones grandes y Selection Brush para sumar o restar con precisión. Mantén Alt u Option para restar.
Refina cabello y bordes suaves. Pinta una franja estrecha que cruce el límite entre sujeto y fondo.
Propaga y revisa. Reproduce, mueve el CTI o avanza fotograma a fotograma. Corrige el primer fotograma donde falle.
Congela después de revisar. Pulsa Freeze y coloca el texto entre la persona aislada y el metraje original.
1Persona aislada Resultado de Object MatteArriba
2Texto, logo o gráfico Elemento detrás de la personaCentro
3Metraje original Fondo sin modificarAbajo
Orden fiable: seleccionar, corregir, refinar, propagar, revisar y congelar.
Todas las herramientas de Object Matte
Object Matte Tool
El punto de partida más rápido. Previsualiza el objeto al pasar el cursor, haz clic o usa Rectangle/Lasso cuando se solapen objetos.
Para sujetos claros
Quick Selection Tool
Roto Brush rediseñado para seleccionar según color, contraste y bordes. Live Update muestra el resultado mientras pintas.
Para grandes zonas perdidas
Selection Brush Tool
Trazos manuales aditivos y sustractivos para corregir fondo incluido, manos perdidas o huecos entre extremidades.
Para correcciones controladas
Refine Edge Tool
Úsala sobre cabello, pelo, tejidos semitransparentes y bordes con motion blur para conservar transparencia parcial.
Para cabello y bordes suaves
Refine Edge no es un pincel de selección general
Define dentro y fuera con las otras herramientas. Usa Refine Edge únicamente en la zona de transición con detalle o transparencia.
El trazo correcto cruza el límite entre cabello y fondo.
Controles importantes
Control
Función
Uso práctico
Feather
Suaviza el límite.
Valores pequeños evitan un recorte duro; demasiado crea halo.
Contrast
Aprieta la transición suave.
Súbelo con moderación después de Feather.
Shift Edges
Expande o contrae el matte.
Un valor negativo ligero elimina franjas claras.
Reduce Chatter
Estabiliza bordes entre fotogramas.
Súbelo si un borde quieto parpadea; bájalo si no sigue movimiento rápido.
Base Refine Edge Radius
Amplía la zona refinada.
Útil si el trazo original fue demasiado estrecho.
Smooth
Suaviza curvas a lo largo del borde.
Mantén un valor bajo para cabello.
Motion Blur
Renderiza desenfoque en el matte.
Alta calidad es más lenta pero limpia en movimientos rápidos.
Decontaminate Edge Colors
Limpia el color del fondo en píxeles translúcidos.
Útil para halos verdes o brillantes.
Propagación, vistas y Freeze
After Effects propaga al reproducir, mover el CTI o avanzar fotograma a fotograma. Los segmentos verdes indican fotogramas procesados. Comprueba Alpha (Alt/Option + 4), Alpha Boundary (Alt/Option + 5) y Alpha Overlay (Alt/Option + 6). Freeze bloquea y guarda la segmentación; descongela antes de cambiar trazos.
Problemas frecuentes
Cabello duro
Refine Edge estrecho, Smooth bajo y ajuste suave de Feather, Contrast y descontaminación.
Borde inestable
Corrige el primer fallo y aumenta un poco Reduce Chatter.
Mano perdida
Añádela con Selection Brush en el primer fotograma incorrecto.
Halo claro
Contrae Shift Edges y limpia el color del borde.
Propagación lenta
Recorta la duración y el área de trabajo; procesa solo lo necesario.
No puedo pintar
Abre el metraje en Layer y verifica que el matte no esté congelado.
¿Object Matte o Roto Brush 3?
Object Matte
Para un sujeto reconocible y el inicio más rápido con pocas correcciones.
Roto Brush 3
Para control tradicional por trazos, propagación avanzada o cuando Object Matte falla.
Masks / Keying
Máscaras para formas simples; Keylight para pantalla verde o azul controlada.
Consejos profesionales
Elige el fotograma base más limpio, no necesariamente el primero.
Usa el menor número de trazos posible.
Corrige el primer fotograma defectuoso.
Iguala la velocidad de fotogramas de composición y fuente.
Öffne das Material im Layer-Panel, wähle Object Matte Tool, fahre über die Person und klicke. Korrigiere mit Quick Selection oder Selection Brush, bearbeite Haare mit Refine Edge, propagiere die Matte, prüfe den ersten fehlerhaften Frame und klicke anschließend auf Freeze.
Was ist in der neuesten Version neu?
Adobe führte die KI-gestützte Object-Matte-Suite in After Effects 26.2 ein. Die aktuelle stabile Version ist 26.3. Object Matte ermöglicht eine Motivauswahl mit einem Klick und bietet manuelle Werkzeuge für schwierige Bereiche. 26.3 verbessert außerdem die flüssige Vergrößerung im Layer-Panel und behebt Stabilitäts- und aerender-Probleme.
Stable und Beta
Disk-Caching für propagierte Object-Matte-Frames ist derzeit eine Beta-Funktion. Schließe in der stabilen Version 26.3 die Propagation ab und verwende Freeze, bevor du das Ergebnis für finales Compositing nutzt.
Die vier Object-Matte-Werkzeuge in After Effects 26.3.
Vollständiger Ablauf für Text hinter einer Person
Dupliziere das Material. Eine unveränderte Kopie bleibt der Hintergrund, die zweite wird freigestellt.
Lege die freigestellte Kopie nach oben. Reihenfolge: Person, Text/Grafik, Originalmaterial.
Erstelle bei Bedarf eine Pre-Comp. Das hält die Timeline sauber, ist aber keine Voraussetzung für Object Matte.
Öffne die echte Footage-Ebene. Doppelklicke sie, damit sie im Layer-Panel erscheint.
Wähle einen starken Basisframe. Die Person sollte vollständig sichtbar, scharf und wenig verdeckt sein.
Wähle Object Matte Tool. Fahre über die Person und klicke; alternativ helfen Rectangle oder Lasso.
Korrigiere die Silhouette. Quick Selection eignet sich für große Bereiche, Selection Brush für präzises Hinzufügen und Abziehen. Halte zum Abziehen Alt oder Option.
Verfeinere Haare. Male mit Refine Edge einen schmalen Streifen über die Grenze zwischen Person und Hintergrund.
Propagiere und prüfe. Spiele ab oder gehe Frame für Frame vor. Korrigiere den ersten fehlerhaften Frame.
Frieren erst nach der Kontrolle. Klicke auf Freeze und platziere Text zwischen freigestellter Person und Originalmaterial.
1Freigestellte Person Object-Matte-ErgebnisOben
2Text, Logo oder Grafik Element hinter der PersonMitte
Der schnellste Start. Vorschau beim Darüberfahren, Auswahl per Klick oder Rectangle/Lasso bei überlappenden Objekten.
Für klare Motive
Quick Selection Tool
Neu gedachter Roto Brush, der anhand von Farbe, Kontrast und Kanten auswählt. Live Update zeigt Änderungen sofort.
Für große fehlende Bereiche
Selection Brush Tool
Manuelle additive und subtraktive Striche für Hintergrundfehler, verlorene Hände oder Zwischenräume.
Für kontrollierte Korrekturen
Refine Edge Tool
Für Haare, Fell, halbtransparenten Stoff und Bewegungsunschärfe. Es bewahrt Teiltransparenz statt einer harten Kante.
Für Haare und weiche Kanten
Refine Edge ist kein allgemeiner Auswahlpinsel
Definiere Motiv und Hintergrund mit den anderen Werkzeugen. Verwende Refine Edge nur in der Übergangszone mit feinen Details.
Der richtige Strich kreuzt die Grenze zwischen Haar und Hintergrund.
Wichtige Matte- und Kantenregler
Regler
Funktion
Praxis
Feather
Macht die Grenze weicher.
Kleine Werte vermeiden harte Schnitte; zu viel erzeugt Halos.
Contrast
Strafft den weichen Übergang.
Nach Feather vorsichtig erhöhen.
Shift Edges
Erweitert oder verkleinert die Matte.
Leicht negativ entfernt helle Hintergrundränder.
Reduce Chatter
Stabilisiert Kanten über Frames.
Erhöhen bei Flimmern; senken, wenn schnelle Bewegung verloren geht.
Base Refine Edge Radius
Erweitert den verfeinerten Bereich.
Hilfreich bei zu schmalem Ausgangsstrich.
Smooth
Glättet Kurven entlang der Kante.
Für Haare niedrig halten.
Motion Blur
Rendert Bewegungsunschärfe in der Matte.
Hohe Qualität ist langsamer, aber sauberer.
Decontaminate Edge Colors
Entfernt Hintergrundfarbe aus teiltransparenten Randpixeln.
Bei grünen oder hellen Halos verwenden.
Propagation, Ansichten und Freeze
After Effects propagiert beim Abspielen, beim Verschieben des CTI oder Frame für Frame. Grüne Segmente markieren berechnete Frames. Prüfe Alpha (Alt/Option + 4), Alpha Boundary (Alt/Option + 5) und Alpha Overlay (Alt/Option + 6). Freeze sperrt und speichert die Segmentierung; vor neuen Auswahlstrichen musst du sie wieder lösen.
Häufige Probleme
Harte Haare
Schmaler Refine-Edge-Strich, wenig Smooth und vorsichtige Feather-/Contrast-Werte.
Flimmernde Kante
Ersten Fehlerframe korrigieren und Reduce Chatter leicht erhöhen.
Hand fehlt
Mit Selection Brush im ersten fehlerhaften Frame hinzufügen.
Heller Halo
Shift Edges leicht verkleinern und Kantenfarben bereinigen.
Langsame Propagation
Layer und Work Area kürzen und nur benötigte Frames berechnen.
Malen nicht möglich
Footage im Layer-Panel öffnen und Freeze-Status prüfen.
Object Matte oder Roto Brush 3?
Object Matte
Für ein klar erkennbares Motiv und den schnellsten Einstieg mit wenigen Korrekturen.
Roto Brush 3
Für einen klassischen strichbasierten Ablauf, tiefere Propagation-Regler oder wiederholte Object-Matte-Fehler.
Masks / Keying
Masken für einfache starre Formen; Keylight für kontrollierten Green- oder Bluescreen.
Profi-Tipps
Wähle den saubersten Basisframe, nicht automatisch den ersten.