
Ultimate Create Layers
User Guide
The complete reference for creating, placing, parenting and styling layers from one focused panel in Adobe After Effects.
Quick Start
Requirements & Installation
Ultimate Create Layers is delivered as a digitally signed ZXP extension package.
What you need
| Item | Requirement |
|---|---|
| Adobe After Effects | A CEP-compatible After Effects version on Windows or macOS. |
| Installation file | Ultimate_Create_Layers_v1.0.0.zxp |
| Installer | ZXP/UXP Installer, aescripts ZXP Installer, or another trusted ZXP installer. |
| Internet | Required for first activation and periodic licence verification. |
Use the secure download link sent to the email used at checkout.
Open your ZXP installer and select or drag Ultimate_Create_Layers_v1.0.0.zxp into it.
Close After Effects completely, then open it again after installation finishes.
Go to Window → Extensions → Ultimate Create Layers, then dock it wherever you prefer.
Activation & Licence
A valid licence is required. Ultimate Create Layers does not include a trial period.
Activate this device
- Open the panel. The activation window appears if the device is not activated.
- Paste your UCL licence key into Licence key.
- Press Activate and wait for server verification.
- When activation succeeds, close the window and start using the tool.
Licence controls
| Activate | Bind the licence to this device. |
| Verify | Check the current activation with the server. |
| Deactivate | Release this device before moving the licence. |
A Tour of the Interface
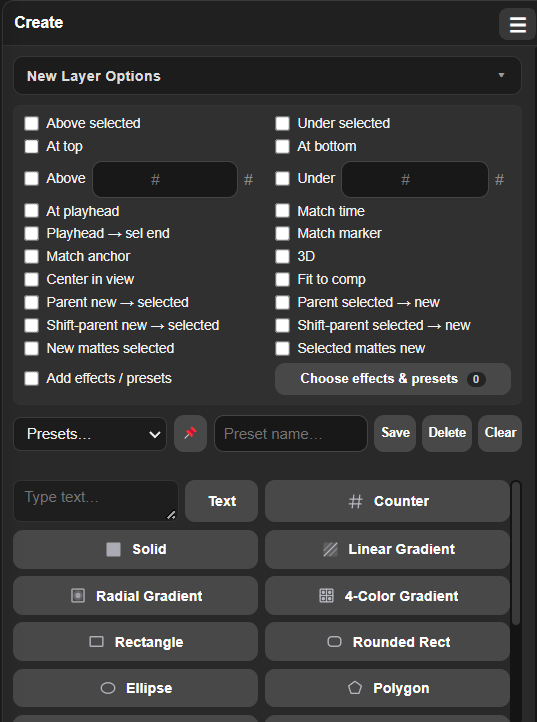
The panel keeps global rules at the top and creation actions below them, so the same setup can be reused across many layer types.
New Layer Options
These rules are applied when the new layer is created. Choose only the rules needed for the current workflow.
Stacking order
Time & matching
View, parent & matte
Options Presets, Effects & Presets
Save repeatable layer setups and automatically apply effects or animation presets after creation.
Save an options preset
- Choose the New Layer Options you want.
- Enter a name in Preset name.
- Press Save.
- Select it later from the Presets list.
Delete removes the selected saved preset. Clear clears the current options without deleting every saved preset.
Pin a preset
Choose a preset and press the pin button. A pinned preset appears as a quick button under New Layer Options.
Press the pin again, or use the preset's unpin control, to remove it from the quick area without deleting the preset itself.
Automatically add effects or presets
This tells the tool to apply the selected items after the new layer is created.
The items already selected are shown immediately, even when the search field is empty.
Type part of an effect or preset name. Matching results appear below the field.
Use the checkboxes to keep several effects and presets selected, then create the layer.
The 17 Creation Actions
Every button creates a native After Effects layer or imports media, then applies the active New Layer Options.
Text & Counter
Create text
- Type into the text field beside the Text button.
- Press Enter to create the text, exactly like clicking Text.
- Press Shift+Enter to add another line without creating yet.
- Text direction switches automatically between left-to-right and right-to-left based on the language you type.
Create an animated counter
Press Counter, set the start and end values, duration and number format, then create the counter.
Prefix and Suffix accept text in all languages. Enable separate lines when the text before or after the number should be placed on another line.
| Counter option | What it controls |
|---|---|
| Start / End | The first and final displayed number. |
| Duration | How long the animation takes. |
| Prefix / Suffix | Text shown before or after the number, with support for all languages. |
| Separate lines | Places prefix or suffix content on its own line. |
| Digits / formatting | Controls decimals, padding and number presentation. |
Clipboard & Image from URL
Paste Clipboard
Copy supported image or clipboard content, make sure the target composition is active, then press Paste Clipboard. The tool imports the content and applies the active placement options.
Image from URL
- Copy the direct URL of an image from your browser.
- Return to After Effects and activate the target comp.
- Press Image from URL.
- The image is downloaded, imported into the project and added to the timeline.
Settings, Reordering & Notifications
Main menu
Open the three-line icon in the panel header to access tool settings, licence controls, help and button arrangement.
Reorder creation buttons
Open the reorder option, arrange the buttons in the order that matches your workflow, then save. The creation area uses that order the next time the panel opens.
Notifications
The bell icon beside the main menu opens product notifications. It can announce a new Ultimate Create Layers version, important information, or another Ultimate Plugins tool.
Use the action inside a notification to open the relevant update or product page.
Help window
The Help/About window gives a compact overview of the tool and includes buttons for the official video playlist and the Ultimate Plugins website.
Keyboard & Modifier Reference
When the text input is focused.
Adds a line without creating the layer yet.
Adds Black & White to the new adjustment layer.
Typing in the search field filters effects and presets.
Select several effects or presets at once.
Show a saved options preset below the options.
Troubleshooting
The extension does not appear in After Effects
Confirm the ZXP installer reported success, close After Effects completely, reopen it, then check Window → Extensions. If it is still missing, reinstall the signed package with a current ZXP installer.
Activation says the configuration is missing or invalid
Make sure you installed the final official v1.0.0 package and did not modify its files. Reinstall the latest signed ZXP, check your internet connection and try again. Contact support if the message remains.
Image from URL reports a bad header
The copied address probably points to a webpage, redirect or blocked response rather than the image file. Open the image by itself, copy the direct image address and try a standard format such as PNG or JPG.
A selection-based option does nothing
Open a composition and select a valid layer before creating. Options such as Above selected, Match time, Match marker, parenting and matte operations need a selection.
Selected effects are not visible
Open Choose effects & presets. Selected items should appear immediately even with an empty search. If they do not, close and reopen the chooser, then reselect the items.
Frequently Asked Questions
Is Ultimate Create Layers a subscription?
No. It is a one-time purchase for the product licence; there is no recurring subscription.
Is there a free trial?
No. A valid licence key is required to use the extension.
Does it support Arabic?
Yes. Text direction follows the typed language automatically, and Counter prefix/suffix text supports all languages.
Can I move my licence to another computer?
Deactivate the old device, then activate the new device. If the old computer is unavailable, contact support.
Where do I find updates?
The bell icon in the extension can notify you of new versions. You can also check the product page or Ultimate Plugins website.
Still need help?
Watch the official walkthrough or contact Ultimate Plugins support.